Showing posts with label side dishes. Show all posts

Sunday, 20 May 2012

MAKING THAT BBQ COMPLETE: STRAWBERRY MEYER'S LEMONADE, YOGURT CUCUMBER SALAD AND ROASTED PEPPERS (GF)

Strawberry Meyers Lemonade

Depending on your lemons, you should get about 1 cup from 5 juicy Meyer's Lemons.  The ones I had were huge and full of juice.   The lemons were also way sweeter than regular lemons, so I didn't need to add much sweetener.  The fresh strawberries also helped with sweetness and added a nice pink tinge to the lemonade.

Sunday, 22 April 2012

PLJESKAVICA (GF) AND GIBANICA (CROATIAN MEAT PATTIES AND SAVOURY CHEESE STRUDEL)


Gibanica is sometimes called Burek (cheese pie).
Serve Gibanica (savoury cheese strudel) with roasted peppers, cucumber salad, tomatoes, raw onions if you like 'em and pljeskavica (grilled meat patties)

Monday, 12 October 2009

THANKSGIVING DINNER

DSC_3784

I promise I have a reasonable excuse for not having posted regularly in such a long time. Really I do.

First, since I’m an English teacher, you know that high school can be hectic in the first couple of months. It has been a tad more hectic this time--more than usual.

Also, last week, I just had two root canals redone. My ex-dentist didn’t really didn’t do a good job of it (about 10 years ago) and I think as a result I developed an infection recently. I went to a fantastic specialist—an endodontist this time and he was highly recommended by my current dentist. I am much more confident that this time it’ll work.

However, after 2 hours in the chair and listening to drilling and chiselling, I still currently have cheeks that only a chipmunk would love and I have slight bruising. This is all normal of course, and though I ate congee for the first few days, I was able to eat the gorgeous free range turkey I roasted today. I just cut everything in itty bitty pieces and chewed on my left side only. Hey, whatever works, right?
DSC_3779

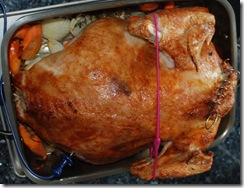
Since I discovered the joys of brining turkeys, I’ll never go back. One year, I delayed too much at purchasing a turkey and as a result I couldn’t find a fresh one anywhere in the supermarkets. I happened to go to Capers/Whole Foods and lo and behold, they had quite a few fresh turkeys left in their fridge. I grabbed one and made the tastiest turkey ever. Since then, I haven’t gone back to the regular supermarket turkeys. I buy free range or organic. It costs way more money but the taste is remarkable. This turkey was a little over 15 pounds. It was $95. Yup. That is indeed pricey. But it is so flavourful!DSC_3787

I loathe dry breast meat and so I don’t waste my hard-earned money on a pricey bird by treating it poorly. I always brine my fresh turkeys the day before. I start in the morning and put the turkey in a large plastic bin. Then I mix hot water and kosher salt with a bit of sugar and stir to dissolve. I then toss in a tea bag filled with some cloves, black peppercorns, and juniper berries. I add plenty of cold water and then submerge the turkey in the brine and stick it all in the fridge until the evening. I drain and dry the turkey and place it uncovered on a rack atop a sheet pan and allow it to dry in the refrigerator overnight. This helps with a crackly skin.

DSC_3795

I start the bird out on a rack in the roasting pan lined with carrots, onions, celery, thyme sprigs from my backyard and some water to catch those yummy drippings. The turkey starts its journey to yummyville with its back up, at a high temperature – 400 degrees F. After an hour, I flip it over and have it breast up for most of the time at 250 degrees F. Then I blast it on high heat again for the final hour for a crisp and crackly skin. Because I have a Wolf oven, I have the luxury of the built-in meat probe and also a convection feature if I’m in a hurry. I never have problems with over or under-cooked meat.

DSC_3785

The best part is the stuffing, and though I’ve tried other types of stuffing, I like a traditional moist bread stuffing: cubed white bread, onions, celery, parsley, poultry seasoning and some eggs and chicken broth. It never disappoints.

DSC_3798

Sure, I’ve even heard of sticky rice stuffing and thought of making it, but since I only make turkey twice a year, I don’t want to take a chance on anything we may not like as much. I’ve tried sausage, bacon, fennel, pine nuts and all the fancy other additions to stuffing, but I like the star attraction to be the turkey. The plain bread stuffing is a wonderful accompaniment.

DSC_3792

One of my daughter’s favourite side dishes is creamed spinach. This time I added chopped white mushrooms. I sauteed them until dry and added them to the creamed spinach mixture and topped everything with parmesan cheese. After baking, it was bubbly, creamy and delicious!

DSC_3800

DSC_3802

For dessert, I had planned to make a pumpkin créme brulée. Unfortunately, when I got to Superstore, the entire section of canned pumpkin was sold out. I looked high and low and thought it better to just forget the idea. So I made créme caramel. It was a perfect ending to a satisfying meal.

Now, I’ll be saying bye for now because I have a stack of things to mark and my seratonin levels are sky-high from all that turkey. I’ll be putting my feet up shortly.

Have a Happy Thanksgiving!

Saturday, 20 October 2007

COMFORT FOODS: COOL THINGS WITH CHEESE!


broccoli & cheese casserole

When fall is in full swing in Vancouver and it's drippy wet outside I find myself wanting comfort foods. For some reason I associate cheese with comfort foods...especially ooey gooey melted cheese. I personally love an authentic fondue but only Bebe loves cheese. But I digress...I tried out a quick recipe I found in a magazine advertising Campbell's Condensed Mushroom Soup.

BROCCOLI & CHEESE CASSEROLE
1 16 oz bag broccoli florets
1 can Campbell's Condensed Mushroom Soup
1 cup shredded cheddar cheese
1/2 cup milk
1/2 cup breadcrumbs
2 T butter, melted

Dump the whole bag of broccoli in a baking dish, add the mushroom soup, milk and cheese and stir the whole mixture. Mix the breadcrumbs and melted butter together and sprinkle that on top of the whole thing and bake it in a moderate oven (350F) for 30-35 minutes or until hot and bubbling.

It was a cheesy & yummy way to eat broccoli!

Now, on another cheesy note...

macaroni & cheese with caramelized onions

I made this mac & cheese with a cheese sauce from scratch. I must admit I didn't follow any recipe but just kind of made a bechamel and then tossed in however much cheese looked good to me. I caramelized onions and garlic and mixed that in with the cheese sauce and finally topped the whole casserole with fried onions. I covered it with foil and baked it until it was bubbling hot, about 20-30 minutes.

Here's a rough approximation of the recipe as I recall it:

Cakebrain's Macaroni & Cheese with Caramelized Onions
1 box macaroni, cooked al dente
3 T flour
3 T butter
salt & pepper to taste
3 cups milk
2 cups grated old cheddar cheese
1 small onion, sliced
3 cloves garlic, minced
2 T olive oil
4 T fried onions

  • Make a bechamel sauce: in a large saucepan, melt the butter and add the flour, creating a roux. Cook the roux until golden brown and fragrant. Add salt & pepper. Add nutmeg if you like it. Slowly add the milk, stirring constantly to prevent lumps and burning. When the sauce is thickened, add the cheddar cheese and mix thoroughly. Allow the sauce to rest, covered and off the burner.
  • In a saute pan, heat the olive oil on med.-high heat and then add the onion. Saute the onions until they are translucent. Then add the garlic and continue cooking until the onions are caramelized. If you like some zing in your macaroni, you can add a couple of tablespoons of balsamic vinegar or hot sauce here. Season with salt & pepper.
  • Mix the onion mixture with the cheese sauce.
  • In a large casserole dish combine the cooked macaroni and the cheese sauce. Mix thoroughly. The cheese sauce should look slightly runny because as it bakes it will be absorbed in the pasta. If you like your macaroni really moist, you can add more milk to the casserole if it looks too dry for your liking.
  • Sprinkle the fried onions over the whole casserole; cover with foil and bake in a moderate oven for 20-30 minutes, or until bubbly
those aren't breadcrumbs, they're fried onions! yum!

Monday, 30 July 2007

BREAD STUFFING WITH BACON & CARAMELIZED ONIONS

(MAKES ABOUT 12 CUPS)
For the best flavour, make sure to cook the onions until they are a deep golden-brown colour.
1 pound bacon, cut crosswise into ½-inch strips
6 medium onions, chopped (about 7 cups)
4 stalks celery, chopped
1 teaspoon salt
½ teaspoon ground black pepper
½ cup fresh parsley leaves, chopped fine
12 cups dried French or other white bread cubes (dried—see note*)
1 cup chicken stock or low-sodium canned broth
3 large eggs, lightly beaten


*Note: to dry bread cubes: leave slices of bread out overnight to dry on cookie sheets. The next day, cut the slices into half-inch cubes and allow them to dry in a single layer for an additional night. QUICKIE METHOD: place cubed bread in a 225 degree oven for 30 minutes or until dried but not browned. You will need a one-pound loaf of bread to obtain the 12 cups of bread cubes necessary for the recipe (that’s about a regular sized loaf of bread).

  1. Cook bacon in large skillet or Dutch overn over medium heat until crisp and browned, about 12 minutes. Remove bacon from pan and drain on paper towels. Discard all but 3 tablespoon of rendered bacon fat.
  2. Increase heat to medium-high and add onions and ¼ teaspoon of salt. Cook onions until golden in colour, making sure to stir occasionally and scrape sides and bottom of pan, about 20 minutes. Add chopped celery. Reduce heat to medium and continue to cook, stirring more often to prevent burning, until onions are deep golden brown, and celery is soft, another 5 minutes. Transfer contents of pan to large bowl.
  3. Add remaining ¾ teaspoon salt, pepper, and parsley to bowl and mix to combine. Add bread cubes. Add drained bacon.
  4. Whisk stock and eggs together in small bowl. Pour mixture over bread cubes. Gently toss to evenly distribute ingredients.
  5. Stuff turkey with stuffing. Or bake the whole thing in a baking dish.
    The stuffing can be covered and refrigerated for one day. Place any stuffing that won’t fit in the bird in a greased baking dish. Dot with pats of butter, and cover with piece of foil that has been smeared with butter or sprayed with non-stick spray. Bake in 400 degree oven for about 25 minutes

LinkWithin

Related Posts Widget for Blogs by LinkWithin