

 Santa's favourite: White Chocolate Covered Oreos! Hand-decorated
  Take a look at that beauty. I know you'd want one.
 Cakebrain's 2008 Christmas Goodies Box! Tiffany Sugar-Cookie Snowflake, Organic Cocoa Nib & Pecan Triangles, Pecan Butter Crunch, Vanilla Bean Butter Sables and White Chocolate Covered Oreo Snowflakes.
 Dear Fellow Food Bloggers,
Have you ever had a furious week of baking and accumulated a ton of things to post but just didn't have the time to photograph it and post it?
Well, that's been me for the last 2 weeks. Not only that, but with that accumulation of baked goods comes the inevitable temptation of the family members. They mill around the sealed tupperware containers and linger by the kitchen counter, hoping to snatch a cookie or two before you tuck them away for gift-giving or other things...like blogging!
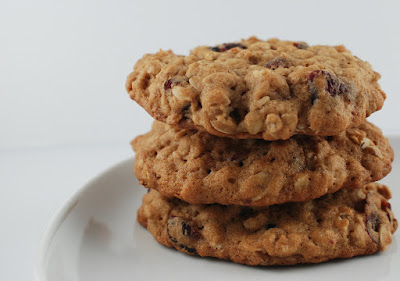
Sometimes, when I bake stuff, I encounter the perfect looking cookie of the batch. You know--the photogenic one. I usually don't have a problem with leaving cookies around, but this year I was a little ticked off when somebody in my household snatched the most handsome butter cookie of the bunch and ate it in 2 seconds. I had a little white plate with 5 different types of cookies. These cookies were the best lookers and made a handsome grouping even though they weren't "artistically presented". They were just minding their own business, the innocent little things, when Stomach, a devout Sweets-hater, nonchalantly grabbed one and inhaled it.
 in this photo, the vanilla bean butter sables are quite fetching, i must admit...
 Yes, I know, I know. I should be jumping in glee that he even ate a cookie because you know he hates to eat baked goods and has rarely had more than a sliver of any cake I made (and that, under a sort of obligatory duress) and yet my automatic reflex was to yell, "NO! not that one!"
"Fine. I won't eat any more of your cookies," he hissed.
"Well, didn't you notice how good-looking they were?" I exclaim exasperatedly. "Those were for my blog photos!" "You could have just asked and I would have given you a whole bunch of other cookies. You're only supposed to eat the ugly ones first!"
He stomped off in a huff and I muttered something about how rude he was.
Bah Humbug.
 :P even a sweets-hater couldn't resist these cookies!
Should I be flattered that He-Who-Doesn't-Eat-Sweets is coveting my butter cookies? I dunno. Well, he won't be back anymore as I think I've scared him off. Perhaps I'll make a peace offering of a pile of yummy butter cookies later. How was I to know he only eats photogenic food?
 cakebrain's tiffany snowflake sugar cookie


 The White Chocolate Oreo cookie idea was not mine of course. Darn. The fine people who make Oreos decided that it would be a good idea to coat them in White Chocolate. They did a good thing. When I saw these in the aisle of my local London Drugs store, I gasped. I had seen them on one of my favourite blogs, The Decorated Cookie and remembered them from a post she had where she piped snowflakes on the white chocolate Oreos. I quickly piled a few boxes into my little shopping basket and rubbed my hands in glee at the prospect of decorating these ready-made pure-white canvases.

 homemade raspberry marshmallow
organic cocoa nib pecan triangles
Last year's Christmas Boxes had some excellent cookies and this year I made two of them again: Medrich's Cocoa Nib Pecan Cookies (which I formed into triangular logs and sliced before baking) and my all-time favourite cookie in terms of ease of making, speed of completion and depth of flavour, my Vanilla Bean Butter Sables. 
My Vanilla Bean Butter Sables incorporate whole ground up vanilla pods and are gorgeously crunchy with their ring of sanding sugar. The dough keeps well in the refrigerator or freezer during the holidays for those unexpected guests. All you do is slice and bake! Yummo! Your house is infused with the heady smell of vanilla and sugar and that's what the holidays are all about around here!
cakebrain's tiffany snowflake sugar cookieIn my 2008 Christmas Cookie Boxes I have made: Pecan Butter Crunch (a pecan and popcorn mix adapted from the Macadamia Butter Crunch recipe from the Martha Stewart Living site) and I also used MS's Sugar Cookie recipe. I used my favourite Tiffany Snowflake design for the Sugar Cookies and also made a few other shapes like Candy Canes, Snowmen and Stockings.
This year's Tiffany Snowflake Sugar Cookies are easy to cut and handle, but for better flavour, I still like last year's Tiffany Snowflake Vanilla Pod Butter Cookie recipe better. With the sugar cookie dough, you don't have to repeatedly refrigerate the dough to get crisp lines; whereas the butter cookie gets soft quite quickly. With the butter cookie dough, I like to cut out a tray's worth and refrigerate it before baking. The sugar cookie dough is very resilient...very forgiving. I never use extra flour to roll out the dough. I just roll between sheets of plastic wrap. It's so clean and easy and I don't get the extra flour in the dough which then results in tougher cookies.
The White Chocolate Oreo cookie idea was not mine of course. Darn. The fine people who make Oreos decided that it would be a good idea to coat them in White Chocolate. They did a good thing. When I saw these in the aisle of my local London Drugs store, I gasped. I had seen them on one of my favourite blogs, The Decorated Cookie and remembered them from a post she had where she piped snowflakes on the white chocolate Oreos. I quickly piled a few boxes into my little shopping basket and rubbed my hands in glee at the prospect of decorating these ready-made pure-white canvases.They were gorgeous and delicious! Trust me, you won't have many people complaining too much about how they aren't homemade. You just have to make them more Christmassy by piping royal icing on them. That's the fun part anyway.
homemade raspberry marshmallowI wanted to add some variety to my Cookie Boxes this year, so instead of just cookies, I decided to try out a marshmallow recipe that didn't use egg whites. The last one I made with egg whites was from Dorie Greenspan's Baking: From My Home to Yours. I made a chocolate variation and it was gorgeous and delicious. I had no complaints. I wanted to make it again, but as you know, there was this little voice inside me saying, "But look at all those other marshmallow recipes out there that don't use egg white...maybe they'll be even better!"
I yielded to that little OCD voice and sought out another recipe. I chose Sherry Yard's basic vanilla marshmallow recipe (from her book Desserts by the Yard) and adapted the heck out of it. I wanted Christmassy and thus I wanted red or pink at least. I felt Raspberry would do it so I incorporated seedless raspberry jam.
The marshmallows were very tasty but I still prefer the texture and appearance of marshmallows made with egg whites. The egg whites contribute a springy airy texture to the marshmallows that I like much better. An interesting problem I encountered with Yard's recipe that I didn't with Greenspan's was that the bottom of my marshmallows were kind of crusty-looking from all the icing sugar/cornstarch and cooking spray used to cover the foil-lined baking pan. The foil didn't really impart much of a pretty pattern either, I thought. I had to use a pastry brush to brush off all the excess icing sugar/cornstarch mixture. I don't recall ever having the "crusties" with the Greenspan recipe. Ah well. It didn't look so pretty but it was rather tasty.
 santa buckling under the weight of this gargantuan chunk of raspberry marshmallow
I've entered my Tiffany Snowflake Sugar Cookie into Susan's Christmas Cookie roundup. Check it out here.


