Saturday, 26 January 2008

HOLY MACRO: EXPLODING GREEN TEA

whazzat?
a hand-rolled high grade exploding chinese green tea ball

ta-da! just add hot water and the green tea ball explodes to reveal dried whole flowers!


I've been getting that feeling all day that I'm fighting a cold or something. Perhaps I've been overusing my voice at work? I'm constantly clearing my throat. The very first thing I reach for is Manuka Honey--my mother brought some back from a trip to Australia and it had a "Manuka Factor" of 30! In Vancouver, I can only buy it with a Manuka Factor of 16 for ingestion.

this particular ball has 2 types of flower. the one in the foreground is chrysanthemum

Well, the Manuka honey isn't all that I do to ward off a cold. I drink green tea like crazy. Today I decided to reach for the groovy Chinese Green Tea Balls that explode when you add it to hot water. They come individually wrapped and cost $2.50 each. I think it's worth it in terms of entertainment value.


i have way too many tea pots! this one rests on a cast iron warmer...the votive is inside

My favourite thing to do is sit with one of my glass teapots resting on a warmer. The little green tea ball slowly blooms as it bobs in the pot and I watch as the flowers inside are revealed. I have a little teacup in my hand and sip the hot green tea while listening to jazz. The votive warmer casts a beautiful light from underneath, highlighting the beautiful bloom. Functional too, it is a must for me, because I dislike it when my tea gets cold. These green tea balls last for quite a few infusions as well. My pile of marking seems to go much faster under these conditions.


the green tea ball is fully bloomed here

So as you can see, I've been playing with the macro lens on my new D80. I invested some time in building myself a "studio" out of a cardboard box last night. I am glad to say that I escaped arterial damage with the exacto blade and was able to successfully carve out my studio unscathed. I still have to purchase some decent lights. I guess my old 80's fluorescent desk light isn't going to cut it anymore. It's starting to do that irritating flickering thing and is on its last legs.

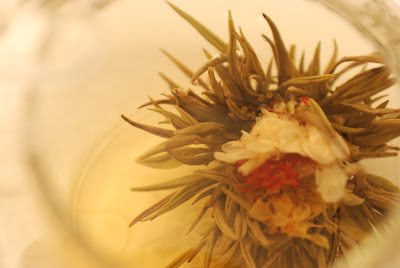
this pic better shows the globe amaranth bloom inside

I have followed the advice of Tartelette and my hubby Stomach and have started using a tripod and have been practising my focussing skills. 'Tis not so easy I must say. The fact that I have a tripod set up now makes me feel as though I'm taking all this photography stuff seriously. But NO! I protest. It's just because my focussing sucks and I can't hold the camera still.

What with all the hobbies and crafts I take on, like cardmaking, scrapbooking, knitting (I have a loom too!), jewelry making, glass mosaics, cake decorating/baking, I can't take up another thing! There's no more room in my already jam-packed craft room! I think I need help. I'm something like a "Crafts & Hobbies" junkie.
NB: you can purchase these clear teapots in most specialty tea stores. My favourite is a Jenaer Glass teapot made in Germany. I have the "Country" teapot and the "Collection" tea service & cups. Here's a catalogue from a wholesaler here. They also have a cool catalogue of other tea accessories. Too bad you can't order from them unless you're a merchant.
As for those blossoming tea balls: they're everywhere in Vancouver it seems; even in coffee shops. Here's a coffee shop in Vancouver called Blenz carrying some. Here's just one site I googled that sold them online worldwide.

Wednesday, 23 January 2008

COCONUT VANILLA BEAN RICE PUDDING

coconut vanilla bean rice pudding brulee
Yes.  This picture is mine.  All mine!  See what the hubbub is about.
This recipe is creamy and deliciously rich. If you love the flavour of coconut, this rice pudding is for you. It incorporates a velvety custard into coconut milk-infused jasmine rice and becomes a decadent dessert suitable for entertaining. My friend N is a fan of coconut and has requested this recipe. I've adapted it from Kate Zuckerman's A Sweet Life. In my rendition, I use a vanilla pod whereas she uses cardamom. For entertaining, I have bruleed the tops in individual dishes and they were fantastic.
One note: if you notice your custard curdling and it looks grainy, you can rescue it by whisking it vigorously using a wire whisk while it is still hot. Or, you can use a blender food processor or stick blender to puree the curdled custard for a minute or two.

Enjoy!

COCONUT VANILLA BEAN RICE PUDDING
adapted from Kate Zuckerman's A Sweet Life(yields 6 cups, serves 8 to 12)

RICE
1/2 cup plus 2 T jasmine rice or basmati rice
1/4 cup sugar
1 (13 1/2-fluid ounce) can coconut milk
1 cup whole milk
1/4 t salt

CUSTARD
1 vanilla bean (or 1 T vanilla extract)
1/2 cup plus 2 T sugar
1 cup whole milk
2 cups heavy cream
5 egg yolks
1 egg

special tools: fine-mesh strainer

Cook the rice. coconut rice, prepared by baking in a covered pot in the oven
  • Preheat the oven to 325 degrees F. Place the rice in a strainer and rinse with cold water. Place the rice in a heavy-bottomed medium-sized saucepan with 2 cups cold water. Bring the rice to a boil and immediately remove the pan from the heat.

  • Strain the rice and discard the starchy water. Place the blanched rice back in the pan and add the sugar, coconut milk, milk, and salt.

  • Bring to a boil, remove from the heat, and cover the pan with aluminum foil or the lid. Place the pan in the oven and bake until the rice expands, and absorbs all the liquids, 30 minutes. (If the pan is not oven-proof, transfer the rice and liquid to a metal or glass baking dish and cover with aluminum foil). If there is still runny milk in the pan, continue to bake, covered, for another 5 to 10 minutes. When the rice is done, remove if from the oven, leave it covered, and set it aside.
Make the custard.
the cream and vanilla bean mixture, prior to cooking and thickening
  • While the rice is baking, make the custard. Split the vanilla bean, scrape out the seeds with a knife and combine the empty pod along with the seeds in a heavy saucepan with 1/2 cup sugar, milk and cream. Bring to a simmer over medium heat. Remove from the heat and allow the vanilla to steep for 10 minutes.
  • In a mixing bowl, combine the egg yolks, egg and remaining 2 tablespoons of sugar and briskly whisk for 1 minute. Using a ladle, slowly whisk some of the hot cream into the egg mixture to warm it. Gradually pour the warmed egg mixture into the hot cream, whisking the cream constantly as you pour.

  • Cook the custard over medium heat, stirring continuously and scraping the bottom with a rubber spatula or wooden spoon, until the custard thickens enough to coat the back of a spoon. Remove from the heat and remove the empty vanilla pod.
Combine the custard and the rice
    the rice pudding is coconut-custardy-creamy
  • Scoop the rice into a large mixing bowl. Pour the hot custard over the rice and, using a whisk, slowly whisk until all of the rice granules are dispersed evenly and the mixture is thoroughly combined. Allow the rice pudding to cool completely.
Serving suggestions
  • Portion into oven-proof individual serving gratin or creme brulee dishes.
  • Sprinkle with granulated sugar and brulee (under a broiler or with a torch).
Storage
Will keep refrigerated, for 3 days

Monday, 21 January 2008

BIB'S FIRST BIRTHDAY CAKE

it's all about the sugar flowers

Another first birthday has passed. These milestones are so fleeting.

Bib enjoyed her birthday party and even got a taste of the chocolate buttercream that I made to frost the butter cake. She loved it. The kids only care about the sugar flowers and buttercream I noticed...

Those Safeway cakes that have the toys on them are coveted primarily for the toys. The cakes aren't so tasty and the coloured sprays they use to create the vivid images leave your tongue a vivid hue of bright pink or blue, depending on whether it was a boys' or girls' cake.


I've got to get my act together for future birthday cakes by not messing about with the taste of the actual cake too much and just plopping a plastic toy on top. The kids don't really care about the texture of the crumb and the flavour of the buttercream so much as the fact that it sports their favourite image on top. I'll have to start looking out for those cheapy plastic toys and collect them for future birthdays.


I kind of knew all this but I figured because it's a first birthday she wouldn't be able to eat much cake anyway. Besides, I'm usually the one that has to eat the leftover cake because Stomach doesn't like sweets (ironic twist of fate). I didn't want to ingest the shortening-based buttercreams used for kids' cakes used by most commercial bakeries. I'm going to continue baking my own cakes. I can't believe how much people pay for birthday cakes. It's ridiculous.

The birthday cake recipe is here. So my January recipe mission is completed and I'm on to looking for my next recipe for February. I still have a fridge full of pistachio macarons and black sesame macarons I had to make because of all the egg whites left over from making the NeoClassic Buttercream recipe. I had enough leftover chocolate buttercream from the cake to fill all the pistachio macarons I made. I love it when I can recycle my leftovers into something yummy! I'll be bringing all my leftovers, including the birthday cake, to the staffroom, I think. Sometimes staff are kind enough to alleviate me of my sugar-burden.

Pistachio Macarons
adapted from tartelette
Makes 35

225 gr powdered sugar
60 gr ground almonds
65 gr pistachios
3 egg whites (about 100gr)
25 gr granulated sugar


  • In a food processor, run the nuts and powdered sugar until the nuts are finely ground. Run through a sieve if needed.
  • Whip the egg whites until foamy, slowly add the granulated sugar, until they are glossy. Continue beating until stiff peaks are formed.

  • Slowly fold the nut/sugar mixture into the whites with a wide spatula. The mixture should remain shiny and flow easily.
  • Fill a pastry bag with the batter and pipe small rounds, the size of a quarter, onto parchment lined baking sheets.
  • Let the macarons rest for 20 minutes to develop a skin. Touch the tops to ensure that they are not tacky. If they are, leave them to rest longer.
  • Preheat the oven to 315 and when they are ready, bake them for 12-15 minutes.
  • Let cool, remove from the paper and fill with the chocolate buttercream.

Sunday, 13 January 2008

NEW TOWN BAKERY & RESTAURANT, CHINATOWN

sticky rice dumplings with green mung beans and salted pork
steamed pork and veggie bun

Who's got the best big buns?
No, not JLo.

In Vancouver's Chinatown, New Town Bakery & Restaurant is an old-fashioned diner with orange naugahyde booths and linoleum floors. Chinese-Canadians in the know realize that this institution is home to Canada's best steamed "big buns". These are not the fluffy white concoctions you find in most Dim Sum Houses. These buns are tender, slightly chewy and full of savoury or sweet fillings. One bun can make a light meal or a big snack. You can freeze them and heat in the microwave, they're portable and kids love them too.
all the buns have red markings stamped on top of the buns indicating the fillings. this one indicates pork and veggie

Some of the Big Bun fillings include: Bbq Pork, Pork and Vegetable, Beef, Red Bean Paste, Veggie and their Special (which includes pretty much everything including a salted duck egg). There are more flavours but these are what I primarily order.

The New Town Bakery stocks Malaysian, Filipino and Chinese bakery items. My favourites are the deep-fried apple tarts (a recipe not as good as the closed-down Hong Kong Cafe--but it'll do!), the Steamed White Rice Pudding (Baak Tong Goh), the Big Buns, and the Sticky Rice in Banana Leaves.
sticky rice dumplings wrapped in banana leaves (dzung)

We like to buy a dozen buns (usually pork and veggie, bbq pork and the special) and freeze them for use throughout the week. We also pick up a few sticky rice dumplings. These can be frozen too and boiled for 30 minutes to heat.

I've eaten in the restaurant a few times. It's cheap eats and many of the Chinese old-timers eat here. Generally however, I like to just grab my hot buns and run.
New Town Bakery & Restaurant
158 Pender Street East
Vancouver, BC V6A 1T3
(604) 689-7835
(604) 682-3398

New Town Bakery & Restaurant (Chinatown) on Urbanspoon

Saturday, 12 January 2008

STEAMED BLACK BEAN GARLIC SPARERIBS

steamed spareribs with black beans & garlic
One of my favourite dishes to order at a Dim Sum restaurant is Steamed Spareribs. Usually the spareribs are made with a black bean and garlic sauce. Some restaurants like to add sliced chilli peppers to the dish and others make a sparerib dish with salted red plums.

This dish is an old standby at our home because it goes so well with a bowl of white rice. All you need to round out the meal is a big plate of stir-fried veggies.

STEAMED SPARERIBS WITH BLACK BEANS & GARLIC
1 lb pork spareribs, cut into one-inch chunks
2 t Black Bean & Garlic Sauce (Lee Kum Kee Brand) * see note
2 cloves garlic, minced
1 t cornstarch
1 dash of pure sesame oil
1/4 t white pepper
1 t shaoxing wine
a pinch of sugar
1 T chopped green onions
2 pickled salted plums (optional), rinsed, pitted and cut into 3 pieces (these are found in a jar in brine)
1 sliced fresh chili pepper (optional) or 1/4 t chili sauce
1T vegetable oil

note: * if you don't have this prepared sauce, or if you are GLUTEN FREE you can replace it with 1 T rinsed salted black beans and 1 clove of minced garlic. Lightly mash the beans and garlic in a mortar and pestle
  • Ensure that the spareribs are clean of bone fragments by washing the meat under cold running water. The meat should appear lighter in colour after this washing process. This will also help improve the texture of the ribs.
  • In a small saucepan, heat the oil and then add the prepared salted plums, black bean garlic sauce, minced garlic and optional chili sauce. Stir, cooking the ingredients on medium high heat until the mixture is fragrant. Do not burn. Set aside.
  • In a bowl, combine the washed spareribs with the cornstarch, sesame oil, white pepper, shaoxing wine and sugar, combining thoroughly.
  • Add the prepared black bean sauce mixture to the sparerib mixture and thoroughly combine. Spread the sparerib mixture evenly in a heatproof dish for steaming.
  • Steam on high heat for 20 minutes
  • Sprinkle the chopped green onions on top and serve

Wednesday, 9 January 2008

BIB'S FIRST BIRTHDAY CAKE: ANNA OLSON'S SWEDISH BUTTER CAKE

I've had The Perfect Cake: 150 Cakes for Every Taste and Occasion, by Susan G. Purdy, sitting on my bookshelf for a while. I go back to the same butter cake recipe all the time because it's easy, not too sweet and has a fine tender crumb. It's simply delicious. It also keeps well. I've used it in all of my Wilton Cake Decorating classes when I had "homework" to do. Layers split well and there are endless variations one can achieve with the basic recipe.

"Anna's Swedish Butter Cake" is my favourite butter cake recipe (that's from Anna Olson by the way). I'm using it for Bib's First Birthday Cake. Here's the recipe.

Anna's Swedish Butter Cake
(from Susan G. Purdy's The Perfect Cake)
2 cups (8 1/2 ounces; 240 g) plus 2 T sifted all-purpose flour
1 t baking powder
1/4 t salt
1 cup (2 sticks, 230 g) lightly salted butter (not margarine), at room temperature
1 1/2 cups (10 1/2 oz; 300 g) granulated sugar
2 large eggs, at room temperature
3/4 cup milk
1 t almond extract (vanilla extract can be substituted)
confectioners' sugar (optional)

  • Prepare two 9-inch round cake pan(s) by spreading solid shortening on bottom and sides; dust evenly with flour; tap out excess. Position rack in centre of oven. Preheat oven to 350degrees F.
  • Sift together flour, baking powder and salt onto a piece of wax paper. Set aside
    With a wooden spoon in a mixing bowl or with an electric mixer, cream together the butter and sugar until smooth and well-blended. Add the eggs, one at a time, beating after each addition.
  • Alternately add the dry ingredients and milk, beating after each addition, beginning and ending with flour. Scrape down the sides of the bowl and the beaters. Stir in the almond or vanilla extract
  • Spoon batter into the prepared pans, level the top, then spread the batter slightly toward the pan edges. Bake in the preheated oven for 55 to 60 minutes for a tube cake or 30 to 35 minutes for layers, or until the top is golden and a cake tester inserted in the centre comes out clean.
  • Cool the cake in its pans on a wire rack for about 10 minutes, then run a knife blade around the edge of the cake. Top with another rack or plate, invert, and lift off the pans. Cool the cake completely before sifting on confectioners' sugar or adding a frosting of your choice.

I'm going to frost this cake with a Rose Levy Beranbaum buttercream: the Neoclassic Chocolate Buttercream. It uses egg yolks as opposed to egg whites, which is a plus because I want to minimize the amount of allergenic ingredients in the cake. Allergenic proteins are primarily found in the egg whites--babies aren't supposed to have egg whites for a while.

Neoclassic Chocolate Buttercream (makes 4 cups/1 3/4 lb/800g; enough to fill and frost two 9-inch by 1 1/2 inch layers)

(from Rose Levy Beranbaum's The Cake Bible )

6 large (3.5 fl oz/ 4 oz/112 g) egg yolks, room temperature
sugar (3/4 cup/5.25 oz/150 g)
corn syrup (1/2 liquid cup/5.75 oz/164 g)
unsalted butter (2 cups/1 lb/454 g) (must be softened)
optional: liqueur or eau-de-vie of your choice (2-4 T/1-2oz/28-56 g)
6 oz extra bittersweet or bittersweet chocolate, melted
  • Have ready a greased 1-cup heatproof glass measure near the range
  • In a bowl beat the yolks with an electric mixer until light in colour. Meanwhile, combine the sugar and corn syrup in a small saucepan (preferably with a nonstick lining) and heat, stirring constantly, until the sugar dissolves and the syrup comes to a rolling boil. (The entire surface will be covered with large bubbles.) Immediately transfer the syrup to the glass measure to stop the cooking.
  • If using an electric hand-held mixer, beat the syrup into the yolks in a steady stream. Don't allow syrup to fall on the beaters or they will spin it onto the sides of the bowl. If using a stand mixer, pour a small amount of syrup over the yolks with the mixer turned off. Immediately beat at high speed for 5 seconds. Stop the mixer and add a larger amount of syrup. Beat at high speed for 5 seconds. Continue with the remaining syrup. For the last addition, use a rubber scraper to remove the syrup clinging to the glass measure. Continue beating until completely cool.
  • Gradually beat in the butter and any optional flavouring. Incorporate the melted bittersweet chocolate. Place in an airtight bowl. Bring to room temperature before using. Rebeat to restore texture.
  • Store: 6 hours room temperature, 1 week refrigerated, 8 months frozen

Sunday, 6 January 2008

HOMEMADE WONTON SOUP

a steaming bowl of homemade wonton soup is food for the soul
It's getting harder and harder to feed Bib. She's almost a year old and wants to eat everything we're eating--but of course she's not allowed to have certain foods yet because they're either choking hazards or have potentially allergenic ingredients. This makes eating out kind of difficult. BUT we still manage to go out every week for Dim Sum or Dinner. Stomach and I figure we have to train them early because that's pretty much our sole form of entertainment nowadays.

fresh wonton wrappers (a.k.a. wonton skins) can be readily purchased at any Asian market or major grocery stores in the refrigerated section

I haven't officially introduced egg whites to Bib because I think she breaks out with nasty eczema when she eats meals that suspiciously have that ingredient (like velveted chicken in restaurant stir-fries). Some baked goods are also off-limits. Poor thing!

wonton filling: i like to crank up the nutritional value of my wontons with bok choy

I've been trying to feed her things that have veggies, protein and carbs all in the same meal. It's not easy. Dark leafy veggies are a hard sell unless they're disguised somehow. So here I am hiding them in the wonton filling. You know...kind of like multi-tasking. Or is that multi-eating? One of my favourite solutions for a quick healthy meal that the kids love: Homemade Wontons in Chicken Broth. Bebe loves hers with udon noodles too. I like mine with bok choy in the broth (no noodles--they're redundant in my opinion).

homemade wontons: no eggs, no seafood, no weird chemicals and perfect for a toddler's meal

Here's my step-by-step method for making wontons. I like to freeze them on the sheet pans for about an hour and then dump them all into a ziploc bag. When we feel like having Wonton Soup, we take however many we want (still frozen) and plop them into chicken broth to cook. Add a package of instant noodles and veggies and you have a full meal!

a tray of wontons ready for the freezer (or soup pot!)


WON TON SOUP
(makes 38 wontons)
1/2 lb ground pork
2 baby bok choy, finely chopped (about 1/3 cup total)
1 1/2 t cornstarch
1 1/2 t sesame oil
1/2 t. salt
dash of white pepper
2 T finely chopped green onion
1 t. shaoxing wine
pinch of sugar
One (380g) Package fresh Wonton Skins
Bowl of water for use in closing the wrappers
Low Sodium Chicken Broth (I use Campbell's in the 1 litre tetra-pak)
  • Combine all ingredients except wonton skins,water and broth in a bowl. Mix well with a spoon.
  • Using a small teaspoon, measure out a scant teaspoon of filling in the centre of each skin.
  • Dip a finger into the bowl of water and trace your finger along 2 adjacent edges of the skin.
  • Fold the wonton skin to form a triangle, with the filling in the centre; gently pressing out any air and ensuring a nice seal
  • With the dumpling pointing away from you, fold the long edge until you can just see the top corner of the dumpling
  • Dip a finger into the bowl of water and trace some water onto the two opposing sides that will be pinched together.
  • Gently pinch the "arms" of the wonton to close and seal.
  • Place on parchment-lined cookie sheet; cover lightly with plastic wrap until you have finished forming all the dumplings
  • You can cook the dumplings by boiling them in chicken broth. They're done when they float to the top.
  • Any leftover raw wontons can be frozen
  • Variations: add veggies, instant noodles, chinese bbq pork, fish balls etc.
  • Deep fried variation: dip in sweet and sour sauce or sweet thai chili sauce

Wednesday, 2 January 2008

COCONUT CLOUD CUBES (COCONUT PUDDING)

coconut cloud cubes are like foamy light clouds of coconut-flavoured jello

I don't know if you can tell, but I received a new camera for Christmas from Stomach. I had been bitching about not being able to play around with my pictures. I had a credit-card thin Sony digital camera that was great for taking everywhere with me but I couldn't do much with the camera other than point and shoot (not that I had any idea what to do otherwise, by the way.) coconut bubbles are captured by gelling the egg white/coconut mixture

Stomach had taken photography courses so he had all these lenses for his Nikon camera that were going to waste what with digital technology. Fortunately, the new Nikon D-80 he bought me can use those lenses now and they haven't gone to waste after all. Now he just has to sell the body of the old camera.

This camera is very heavy compared to the micro-thin camera I'm used to but it's fun playing around with the settings. I haven't figured out entirely how to focus properly and apparently my composition sucks because I've never taken a photography course in my life! so bear with me. I think I'm having fun and I don't really care anyway. I think I see some further accessory purchases for this camera on the horizon, namely those fancy schmancy flashes that go off simultaneously. Lighting is definitely an issue.

coconut cloud cubes are great if you like coconut flavour but not the texture of dessicated coconut

This dessert is more of a gelled pudding than anything. You can enjoy Coconut Pudding at your local Dim Sum restaurant and sometimes it's made with an egg white foam and other times it isn't. When egg whites are incorporated into the pudding, the texture becomes almost spongy. It's snow-white and a wonderful play of cold, foamy coconut; quite like biting into a cloud if it were made of coconut cream!

COCONUT CLOUD PUDDING (COCONUT PUDDING/ YEH JUP GOH)

1 cup (250 ml) water
5 oz (125 g) castor sugar
1 oz (25 g) gelatine
1 cup (250 ml) coconut milk
1 cup (250 ml) 2% milk
6 oz (150 ml) egg white
  • Boil water, add sugar and stir to dissolve. Cool slightly and add gelatine. Stir well to dissolve. Add coconut milk and 2% milk.
  • Chill the mixture in the refrigerator until half set (to the consistency of thick cream). Check every 10 minutes, stirring to ensure even setting. If the geletine mixture is over-set, melt over hot water and re-chill until you get a creamy consistency.
  • Whip egg whites in stand mixer until stiff peaks form. Gradually add the gelatine mixture until ingredients are well combined
  • Immediately pour mixture into plastic-lined pan or molds and chill until firm and set.
  • Cut into cubes; serve cold

LinkWithin

Related Posts Widget for Blogs by LinkWithin